unity shader内置变量(时间)

纹理动画——序列帧动画
可以将序列的纹理按顺序选中后ctrl+6可以自动生成序列帧动画。
也可以通过shader:提供一张包含了关键帧的图像,重点在于需要在每个时刻计算该时刻下应该播放的关键帧的位置,并对该关键帧进行纹理采样。
Shader "Unity Shaders Book/Chapter 11/Image Sequence Animation" {
Properties {
_Color ("Color Tint", Color) = (1, 1, 1, 1)
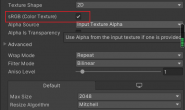
_MainTex ("Image Sequence", 2D) = "white" {}
_HorizontalAmount ("Horizontal Amount", Float) = 4//横向几个关键帧
_VerticalAmount ("Vertical Amount", Float) = 4//竖向几个关键帧
_Speed ("Speed", Range(1, 100)) = 30//控制序列帧动画的播放速度
}
SubShader {
//序列帧图像通常是透明纹理,所以进行相关标签设置。
Tags {"Queue"="Transparent" "IgnoreProjector"="True" "RenderType"="Transparent"}
Pass {
Tags { "LightMode"="ForwardBase" }
ZWrite Off
Blend SrcAlpha OneMinusSrcAlpha
CGPROGRAM
#pragma vertex vert
#pragma fragment frag
#include "UnityCG.cginc"
fixed4 _Color;
sampler2D _MainTex;
float4 _MainTex_ST;
float _HorizontalAmount;
float _VerticalAmount;
float _Speed;
struct a2v {
float4 vertex : POSITION;
float2 texcoord : TEXCOORD0;
};
struct v2f {
float4 pos : SV_POSITION;
float2 uv : TEXCOORD0;
};
v2f vert (a2v v) {
v2f o;
o.pos = UnityObjectToClipPos(v.vertex);
o.uv = TRANSFORM_TEX(v.texcoord, _MainTex);
return o;
}
fixed4 frag (v2f i) : SV_Target {
float time = floor(_Time.y * _Speed);
//计算出关键帧所在的行列索引数
float row = floor(time / _HorizontalAmount);
float column = time - row * _HorizontalAmount;
// half2 uv = float2(i.uv.x /_HorizontalAmount, i.uv.y / _VerticalAmount);
// uv.x += column / _HorizontalAmount;
// uv.y -= row / _VerticalAmount;
half2 uv = i.uv + half2(column, -row);
uv.x /= _HorizontalAmount;
uv.y /= _VerticalAmount;
fixed4 c = tex2D(_MainTex, uv);
c.rgb *= _Color;
return c;
}
ENDCG
}
}
FallBack "Transparent/VertexLit"
}
纹理动画——滚动的背景
如果要模拟第一层比第二层更远的效果,第一层的滚动速度要小于第二层的滚动速度。
Shader "Unity Shaders Book/Chapter 11/Scrolling Background" {
	Properties {
		_MainTex ("Base Layer (RGB)", 2D) = "white" {}//第一层
		_DetailTex ("2nd Layer (RGB)", 2D) = "white" {}//第二层
		_ScrollX ("Base layer Scroll Speed", Float) = 1.0//第一层水平滚动速度
		_Scroll2X ("2nd layer Scroll Speed", Float) = 1.0//第二层水平滚动速度
		_Multiplier ("Layer Multiplier", Float) = 1//纹理的整体亮度
	}
	SubShader {
		Tags { "RenderType"="Opaque" "Queue"="Geometry"}
		Pass {
			Tags { "LightMode"="ForwardBase" }
			CGPROGRAM
			#pragma vertex vert
			#pragma fragment frag
			#include "UnityCG.cginc"
			sampler2D _MainTex;
			sampler2D _DetailTex;
			float4 _MainTex_ST;
			float4 _DetailTex_ST;
			float _ScrollX;
			float _Scroll2X;
			float _Multiplier;
			struct a2v {
				float4 vertex : POSITION;
				float4 texcoord : TEXCOORD0;
			};
			struct v2f {
				float4 pos : SV_POSITION;
				float4 uv : TEXCOORD0;
			};
			v2f vert (a2v v) {
				v2f o;
				o.pos = UnityObjectToClipPos(v.vertex);
				o.uv.xy = TRANSFORM_TEX(v.texcoord, _MainTex) + frac(float2(_ScrollX, 0.0) * _Time.y);
				o.uv.zw = TRANSFORM_TEX(v.texcoord, _DetailTex) + frac(float2(_Scroll2X, 0.0) * _Time.y);
				return o;
			}
			fixed4 frag (v2f i) : SV_Target {
				fixed4 firstLayer = tex2D(_MainTex, i.uv.xy);
				fixed4 secondLayer = tex2D(_DetailTex, i.uv.zw);
				fixed4 c = lerp(firstLayer, secondLayer, secondLayer.a);
				c.rgb *= _Multiplier;
				return c;
			}
			ENDCG
		}
	}
	FallBack "VertexLit"
}
顶点动画——流动的河流
使用正弦函数来模拟水流的波动效果,批处理会合并所有相关的模型,模型各自的模型空间就会失去,所需要关闭批处理操作:
Shader "Unity Shaders Book/Chapter 11/Water" {
	Properties {
		_MainTex ("Main Tex", 2D) = "white" {}//河流纹理
		_Color ("Color Tint", Color) = (1, 1, 1, 1)//整体颜色
		_Magnitude ("Distortion Magnitude", Float) = 1//水流波动的幅度
 		_Frequency ("Distortion Frequency", Float) = 1//波动频率
 		_InvWaveLength ("Distortion Inverse Wave Length", Float) = 10//波长的倒数
 		_Speed ("Speed", Float) = 0.5//移动速度
	}
	SubShader {
		// Need to disable batching because of the vertex animation
		Tags {"Queue"="Transparent" "IgnoreProjector"="True" "RenderType"="Transparent" "DisableBatching"="True"}
		Pass {
			Tags { "LightMode"="ForwardBase" }
			ZWrite Off
			Blend SrcAlpha OneMinusSrcAlpha
			Cull Off
			CGPROGRAM
			#pragma vertex vert
			#pragma fragment frag
			#include "UnityCG.cginc"
			sampler2D _MainTex;
			float4 _MainTex_ST;
			fixed4 _Color;
			float _Magnitude;
			float _Frequency;
			float _InvWaveLength;
			float _Speed;
			struct a2v {
				float4 vertex : POSITION;
				float4 texcoord : TEXCOORD0;
			};
			struct v2f {
				float4 pos : SV_POSITION;
				float2 uv : TEXCOORD0;
			};
			v2f vert(a2v v) {
				v2f o;
				float4 offset;
				offset.yzw = float3(0.0, 0.0, 0.0);
				offset.x = sin(_Frequency * _Time.y + v.vertex.x * _InvWaveLength + v.vertex.y * _InvWaveLength + v.vertex.z * _InvWaveLength) * _Magnitude;
				o.pos = UnityObjectToClipPos(v.vertex + offset);//顶点动画
				o.uv = TRANSFORM_TEX(v.texcoord, _MainTex);
				o.uv +=  float2(0.0, _Time.y * _Speed);//纹理动画
				return o;
			}
			fixed4 frag(v2f i) : SV_Target {
				fixed4 c = tex2D(_MainTex, i.uv);
				c.rgb *= _Color.rgb;
				return c;
			}
			ENDCG
		}
	}
	FallBack "Transparent/VertexLit"
}
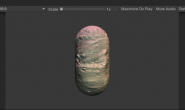
顶点动画——广告牌
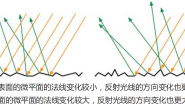
广告牌技术会根据视角方向来旋转一个被纹理着色的多边形(通常是简单的四边形),使多边形看起来好像总是对着摄像机,比如渲染烟雾、云朵、闪光效果等。
广告牌技术的本质是构建旋转矩阵:表面法线+指向上的方向+指向右的方向,再加锚点来控制多边形在空间中的位置。
计算过程:通过初始计算可以得到目标的表面法线和指向上的方向,但这两者通常不垂直。但其中一者是固定的。模拟草丛时,指向上的方向固定。模拟粒子效果时,表面法线固定。
假设法线固定:法线和指向上的方向叉乘得到指向右的方向,归一化后,法线和指向右的方向叉乘得到正交的指向上的方向:
Shader "Unity Shaders Book/Chapter 11/Billboard" {
	Properties {
		_MainTex ("Main Tex", 2D) = "white" {}
		_Color ("Color Tint", Color) = (1, 1, 1, 1)
		_VerticalBillboarding ("Vertical Restraints", Range(0, 1)) = 1 //用于调整是固定法线还是固定指向上的方向
	}
	SubShader {
		// Need to disable batching because of the vertex animation
		Tags {"Queue"="Transparent" "IgnoreProjector"="True" "RenderType"="Transparent" "DisableBatching"="True"}
		Pass {
			Tags { "LightMode"="ForwardBase" }
			ZWrite Off
			Blend SrcAlpha OneMinusSrcAlpha
			Cull Off
			CGPROGRAM
			#pragma vertex vert
			#pragma fragment frag
			#include "Lighting.cginc"
			sampler2D _MainTex;
			float4 _MainTex_ST;
			fixed4 _Color;
			fixed _VerticalBillboarding;
			struct a2v {
				float4 vertex : POSITION;
				float4 texcoord : TEXCOORD0;
			};
			struct v2f {
				float4 pos : SV_POSITION;
				float2 uv : TEXCOORD0;
			};
			v2f vert (a2v v) {
				v2f o;
				//所有计算都在模型空间下计算
				// Suppose the center in object space is fixed
				float3 center = float3(0, 0, 0);//模型空间原点作为锚点
				//将视角方向变换到模型空间下
				float3 viewer = mul(unity_WorldToObject,float4(_WorldSpaceCameraPos, 1));
				float3 normalDir = viewer - center;//计算目标法线方向
				// If _VerticalBillboarding equals 1, we use the desired view dir as the normal dir
				// Which means the normal dir is fixed
				// Or if _VerticalBillboarding equals 0, the y of normal is 0
				// Which means the up dir is fixed
				normalDir.y =normalDir.y * _VerticalBillboarding;//0乘normal的y代表固定向上的方向
				normalDir = normalize(normalDir);
				// Get the approximate up dir
				// If normal dir is already towards up, then the up dir is towards front
				float3 upDir = abs(normalDir.y) > 0.999 ? float3(0, 0, 1) : float3(0, 1, 0);
				float3 rightDir = normalize(cross(upDir, normalDir));
				upDir = normalize(cross(normalDir, rightDir));
				// Use the three vectors to rotate the quad
				float3 centerOffs = v.vertex.xyz - center;
				float3 localPos = center + rightDir * centerOffs.x + upDir * centerOffs.y + normalDir * centerOffs.z;
                o.pos = UnityObjectToClipPos(float4(localPos, 1));
				o.uv = TRANSFORM_TEX(v.texcoord,_MainTex);
				return o;
			}
			fixed4 frag (v2f i) : SV_Target {
				fixed4 c = tex2D (_MainTex, i.uv);
				c.rgb *= _Color.rgb;
				return c;
			}
			ENDCG
		}
	}
	FallBack "Transparent/VertexLit"
}
使用quad来作为广告牌,不能使用plane的原因是,代码建立在竖直摆放的多边形的基础上,多边形的顶点结构需要满足在模型空间下是竖直排列的,只有这样,才能使用vertex来计算得到正确的相对于中心的位置偏移量。
顶点动画的注意事项
取消批处理会增加drawcall,因此要尽量避免使用模型空间下的一些绝对位置和方向来计算,在广告牌中,可以利用顶点颜色来存储每个顶点到锚点的距离值。同样在阴影的时候,需要自定义shadowcaster的pass来确保阴影效果的正确:
Shader "Unity Shaders Book/Chapter 11/Vertex Animation With Shadow" {
	Properties {
		_MainTex ("Main Tex", 2D) = "white" {}
		_Color ("Color Tint", Color) = (1, 1, 1, 1)
		_Magnitude ("Distortion Magnitude", Float) = 1
 		_Frequency ("Distortion Frequency", Float) = 1
 		_InvWaveLength ("Distortion Inverse Wave Length", Float) = 10
 		_Speed ("Speed", Float) = 0.5
	}
	SubShader {
		// Need to disable batching because of the vertex animation
		Tags {"DisableBatching"="True"}
		Pass {
			Tags { "LightMode"="ForwardBase" }
			Cull Off
			CGPROGRAM
			#pragma vertex vert
			#pragma fragment frag
			#include "UnityCG.cginc"
			sampler2D _MainTex;
			float4 _MainTex_ST;
			fixed4 _Color;
			float _Magnitude;
			float _Frequency;
			float _InvWaveLength;
			float _Speed;
			struct a2v {
			    float4 vertex : POSITION;
			    float4 texcoord : TEXCOORD0;
			};
			struct v2f {
			    float4 pos : SV_POSITION;
			    float2 uv : TEXCOORD0;
			};
			v2f vert(a2v v) {
				v2f o;
				float4 offset;
				offset.yzw = float3(0.0, 0.0, 0.0);
				offset.x = sin(_Frequency * _Time.y + v.vertex.x * _InvWaveLength + v.vertex.y * _InvWaveLength + v.vertex.z * _InvWaveLength) * _Magnitude;
				o.pos = UnityObjectToClipPos(v.vertex + offset);
				o.uv = TRANSFORM_TEX(v.texcoord, _MainTex);
				o.uv +=  float2(0.0, _Time.y * _Speed);
				return o;
			}
			fixed4 frag(v2f i) : SV_Target {
				fixed4 c = tex2D(_MainTex, i.uv);
				c.rgb *= _Color.rgb;
				return c;
			}
			ENDCG
		}
		// Pass to render object as a shadow caster
		Pass {
			Tags { "LightMode" = "ShadowCaster" }
			CGPROGRAM
			#pragma vertex vert
			#pragma fragment frag
			#pragma multi_compile_shadowcaster
			#include "UnityCG.cginc"
			float _Magnitude;
			float _Frequency;
			float _InvWaveLength;
			float _Speed;
			struct v2f {
			    V2F_SHADOW_CASTER;
			};
			v2f vert(appdata_base v) {
				v2f o;
				float4 offset;
				offset.yzw = float3(0.0, 0.0, 0.0);
				offset.x = sin(_Frequency * _Time.y + v.vertex.x * _InvWaveLength + v.vertex.y * _InvWaveLength + v.vertex.z * _InvWaveLength) * _Magnitude;
				v.vertex = v.vertex + offset;
				TRANSFER_SHADOW_CASTER_NORMALOFFSET(o)
				return o;
			}
			fixed4 frag(v2f i) : SV_Target {
			    SHADOW_CASTER_FRAGMENT(i)
			}
			ENDCG
		}
	}
	FallBack "VertexLit"
}