消融效果
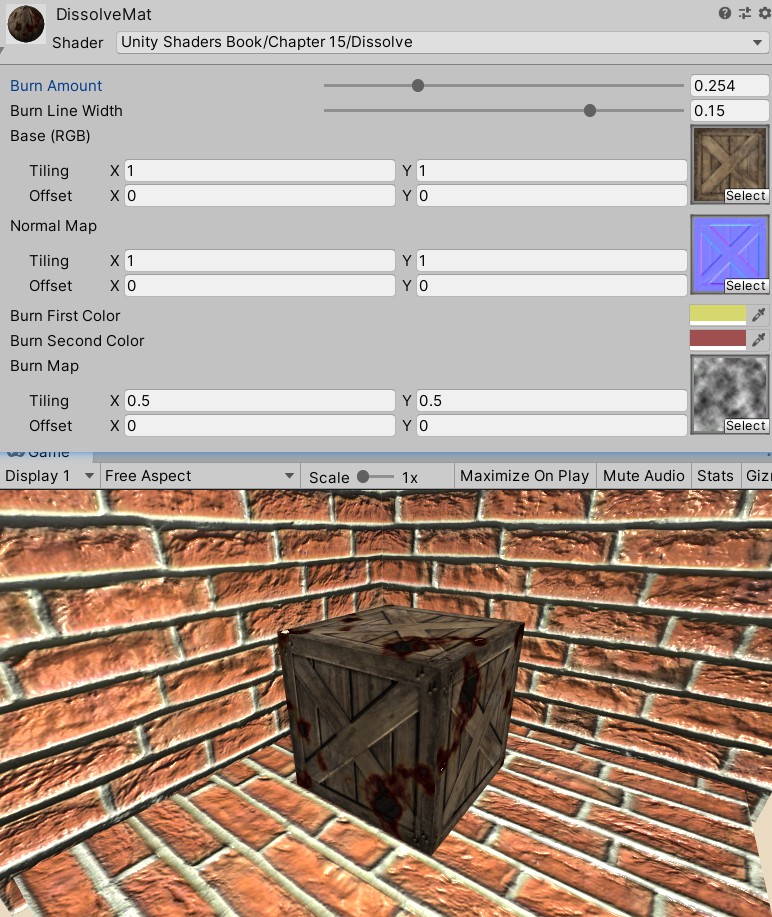
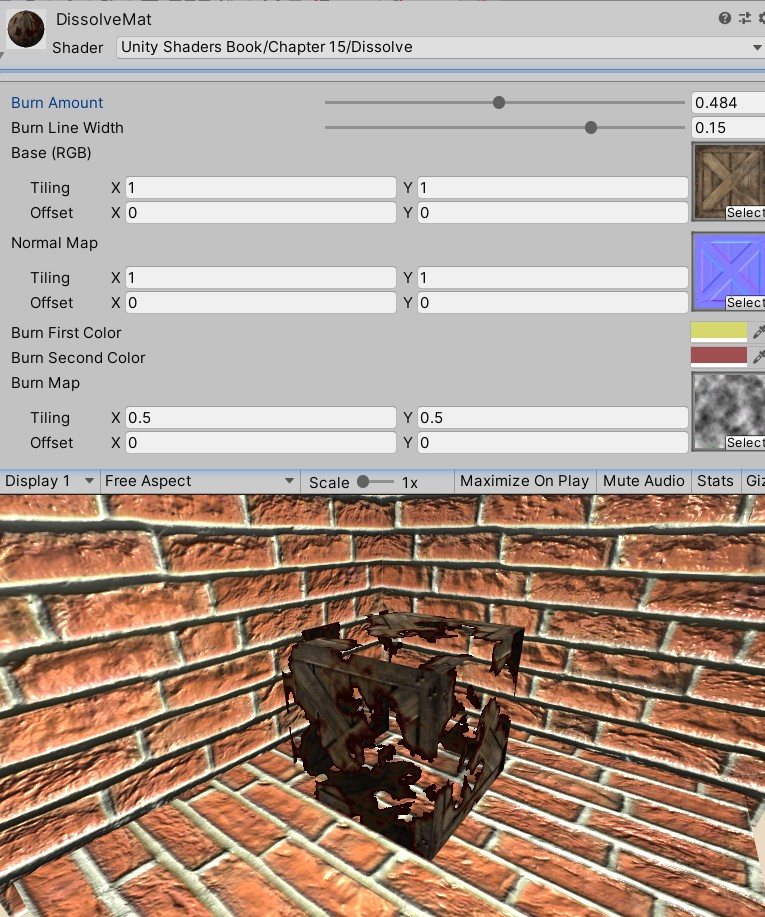
消融(dissolve)效果常见于游戏中的角色死亡、地图烧毁等效果,从不同的区域开始,向看似随机的方向扩张消失。
使用噪声纹理+透明度测试:对噪声纹理进行采样,结果和某个控制消融程度的阈值比较,小于阈值就使用clip函数把它对应的像素剪裁掉。镂空区域边缘的烧焦效果是将两种颜色混合,再使用pow函数处理后与原纹理颜色混合的效果。
Shader "Unity Shaders Book/Chapter 15/Dissolve" {
	Properties {
		_BurnAmount ("Burn Amount", Range(0.0, 1.0)) = 0.0
		_LineWidth("Burn Line Width", Range(0.0, 0.2)) = 0.1
		_MainTex ("Base (RGB)", 2D) = "white" {}
		_BumpMap ("Normal Map", 2D) = "bump" {}
		_BurnFirstColor("Burn First Color", Color) = (1, 0, 0, 1)
		_BurnSecondColor("Burn Second Color", Color) = (1, 0, 0, 1)
		_BurnMap("Burn Map", 2D) = "white"{}
	}
	SubShader {
		Tags { "RenderType"="Opaque" "Queue"="Geometry"}
		Pass {
			Tags { "LightMode"="ForwardBase" }
			Cull Off//消融会导致裸露模型内部的构造,只渲染正面会出现错误的结果。
			CGPROGRAM
			#include "Lighting.cginc"
			#include "AutoLight.cginc"
			#pragma multi_compile_fwdbase
			#pragma vertex vert
			#pragma fragment frag
			fixed _BurnAmount;//控制消融程度,1—完全消融
			fixed _LineWidth;//控制模拟烧焦效果时的线宽,越大,火焰边缘的蔓延范围越广
			sampler2D _MainTex;
			sampler2D _BumpMap;
			fixed4 _BurnFirstColor;//火焰边缘的两种颜色
			fixed4 _BurnSecondColor;
			sampler2D _BurnMap;//噪声纹理
			float4 _MainTex_ST;
			float4 _BumpMap_ST;
			float4 _BurnMap_ST;
			struct a2v {
				float4 vertex : POSITION;
				float3 normal : NORMAL;
				float4 tangent : TANGENT;
				float4 texcoord : TEXCOORD0;
			};
			struct v2f {
				float4 pos : SV_POSITION;
				float2 uvMainTex : TEXCOORD0;
				float2 uvBumpMap : TEXCOORD1;
				float2 uvBurnMap : TEXCOORD2;
				float3 lightDir : TEXCOORD3;
				float3 worldPos : TEXCOORD4;
				SHADOW_COORDS(5)
			};
			v2f vert(a2v v) {
				v2f o;
				o.pos = UnityObjectToClipPos(v.vertex);
				o.uvMainTex = TRANSFORM_TEX(v.texcoord, _MainTex);
				o.uvBumpMap = TRANSFORM_TEX(v.texcoord, _BumpMap);
				o.uvBurnMap = TRANSFORM_TEX(v.texcoord, _BurnMap);
				TANGENT_SPACE_ROTATION;
  				o.lightDir = mul(rotation, ObjSpaceLightDir(v.vertex)).xyz;
  				o.worldPos = mul(unity_ObjectToWorld, v.vertex).xyz;
  				TRANSFER_SHADOW(o);
				return o;
			}
			fixed4 frag(v2f i) : SV_Target {
				fixed3 burn = tex2D(_BurnMap, i.uvBurnMap).rgb;//噪声纹理采样
				clip(burn.r - _BurnAmount);//小于阈值则会被剔除
				float3 tangentLightDir = normalize(i.lightDir);
				fixed3 tangentNormal = UnpackNormal(tex2D(_BumpMap, i.uvBumpMap));
				fixed3 albedo = tex2D(_MainTex, i.uvMainTex).rgb;
				fixed3 ambient = UNITY_LIGHTMODEL_AMBIENT.xyz * albedo;
				fixed3 diffuse = _LightColor0.rgb * albedo * max(0, dot(tangentNormal, tangentLightDir));
				//t=1:该像素位于消融的边界处,t=0:该像素为正常的模型颜色
				fixed t = 1 - smoothstep(0.0, _LineWidth, burn.r - _BurnAmount);//在[0.0, _LineWidth]得到平滑过度的值
				fixed3 burnColor = lerp(_BurnFirstColor, _BurnSecondColor, t);//用t来混合两种火焰颜色
				burnColor = pow(burnColor, 5);//烧焦的颜色
				UNITY_LIGHT_ATTENUATION(atten, i, i.worldPos);
				//* step(0.0001, _BurnAmount)保证_BurnAmount为0时,不显示任何消融效果。
				fixed3 finalColor = lerp(ambient + diffuse * atten, burnColor, t * step(0.0001, _BurnAmount));
				return fixed4(finalColor, 1);
			}
			ENDCG
		}
		//使用透明度测试的物体的阴影需要特别处理,被剔除的区域不会再向其他物体投射阴影。
		// Pass to render object as a shadow caster
		Pass {
			Tags { "LightMode" = "ShadowCaster" }//用于投射阴影的pass
			CGPROGRAM
			#pragma vertex vert
			#pragma fragment frag
			#pragma multi_compile_shadowcaster
			#include "UnityCG.cginc"
			fixed _BurnAmount;
			sampler2D _BurnMap;
			float4 _BurnMap_ST;
			struct v2f {
				V2F_SHADOW_CASTER;//定义阴影投射需要定义的变量
				float2 uvBurnMap : TEXCOORD1;
			};
			v2f vert(appdata_base v) {
				v2f o;
				TRANSFER_SHADOW_CASTER_NORMALOFFSET(o)//填充变量
				o.uvBurnMap = TRANSFORM_TEX(v.texcoord, _BurnMap);
				return o;
			}
			fixed4 frag(v2f i) : SV_Target {
				fixed3 burn = tex2D(_BurnMap, i.uvBurnMap).rgb;//噪声纹理采样
				clip(burn.r - _BurnAmount);//小于阈值则会被剔除
				SHADOW_CASTER_FRAGMENT(i)//阴影投射,把结果输出到深度图和阴影映射纹理中。
			}
			ENDCG
		}
	}
	FallBack "Diffuse"
}
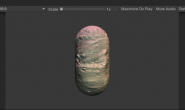
效果:

水波效果
模拟实时水面的过程中,使用噪声纹理,通常作为一个高度图以不断修改水面的法线方向,为了模拟水不断流动的效果,还可以使用和时间相关的变量来对噪声纹理进行采样,得到法线信息后,再进行正常的反射+折射计算,得到最后的水面波动效果。
模拟反射:使用一张cubemap作为环境纹理
模拟折射:使用grabpass来获取当前屏幕的渲染纹理,并使用切线空间下的法线方向对像素的屏幕坐标进行偏移,再使用该坐标对渲染纹理进行屏幕采样。
水波的法线纹理:由一张噪声纹理生成,且会随着时间变化不断平移,模拟波光粼粼。
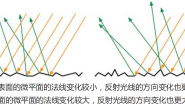
混合反射和折射:使用之前得到的菲涅尔系数来动态决定混合系数,fresnel=pow(1-max(0,v·n),4),视角和法线方向夹角越小,fresnel值越小,反射越弱,折射越强,菲涅尔系数还常用于边缘光照的计算。
Shader "Unity Shaders Book/Chapter 15/Water Wave" {
	Properties {
		_Color ("Main Color", Color) = (0, 0.15, 0.115, 1)
		_MainTex ("Base (RGB)", 2D) = "white" {}
		_WaveMap ("Wave Map", 2D) = "bump" {}
		_Cubemap ("Environment Cubemap", Cube) = "_Skybox" {}
		_WaveXSpeed ("Wave Horizontal Speed", Range(-0.1, 0.1)) = 0.01
		_WaveYSpeed ("Wave Vertical Speed", Range(-0.1, 0.1)) = 0.01
		_Distortion ("Distortion", Range(0, 100)) = 10
	}
	SubShader {
		// We must be transparent, so other objects are drawn before this one.
		Tags { "Queue"="Transparent" "RenderType"="Opaque" }
		// This pass grabs the screen behind the object into a texture.
		// We can access the result in the next pass as _RefractionTex
		GrabPass { "_RefractionTex" }
		Pass {
			Tags { "LightMode"="ForwardBase" }
			CGPROGRAM
			#include "UnityCG.cginc"
			#include "Lighting.cginc"
			#pragma multi_compile_fwdbase
			#pragma vertex vert
			#pragma fragment frag
			fixed4 _Color;//控制水面颜色
			sampler2D _MainTex;//水面波纹材质纹理
			float4 _MainTex_ST;
			sampler2D _WaveMap;//噪声纹理生成的法线纹理
			float4 _WaveMap_ST;
			samplerCUBE _Cubemap;//模拟反射的立方体纹理
			fixed _WaveXSpeed;//法线纹理在xy方向上的平移速度
			fixed _WaveYSpeed;
			float _Distortion;	//控制模拟折射时图像的扭曲程度
			sampler2D _RefractionTex;//grabpass得到的纹理
			float4 _RefractionTex_TexelSize;
			struct a2v {
				float4 vertex : POSITION;
				float3 normal : NORMAL;
				float4 tangent : TANGENT;
				float4 texcoord : TEXCOORD0;
			};
			struct v2f {
				float4 pos : SV_POSITION;
				float4 scrPos : TEXCOORD0;
				float4 uv : TEXCOORD1;
				float4 TtoW0 : TEXCOORD2;
				float4 TtoW1 : TEXCOORD3;
				float4 TtoW2 : TEXCOORD4;
			};
			v2f vert(a2v v) {
				v2f o;
				o.pos = UnityObjectToClipPos(v.vertex);
				o.scrPos = ComputeGrabScreenPos(o.pos);//抓取屏幕图像的采样坐标
				o.uv.xy = TRANSFORM_TEX(v.texcoord, _MainTex);
				o.uv.zw = TRANSFORM_TEX(v.texcoord, _WaveMap);
				//在片元着色器中需要把法线从切线空间变换到世界空间下,以便对cubemap采样
				float3 worldPos = mul(unity_ObjectToWorld, v.vertex).xyz;
				fixed3 worldNormal = UnityObjectToWorldNormal(v.normal);
				fixed3 worldTangent = UnityObjectToWorldDir(v.tangent.xyz);
				fixed3 worldBinormal = cross(worldNormal, worldTangent) * v.tangent.w;
				o.TtoW0 = float4(worldTangent.x, worldBinormal.x, worldNormal.x, worldPos.x);
				o.TtoW1 = float4(worldTangent.y, worldBinormal.y, worldNormal.y, worldPos.y);
				o.TtoW2 = float4(worldTangent.z, worldBinormal.z, worldNormal.z, worldPos.z);
				return o;
			}
			fixed4 frag(v2f i) : SV_Target {
				float3 worldPos = float3(i.TtoW0.w, i.TtoW1.w, i.TtoW2.w);
				fixed3 viewDir = normalize(UnityWorldSpaceViewDir(worldPos));
				float2 speed = _Time.y * float2(_WaveXSpeed, _WaveYSpeed);//法线纹理当前的偏移量
				// Get the normal in tangent space
				//两次采样模拟两层交叉的水面波动的效果
				fixed3 bump1 = UnpackNormal(tex2D(_WaveMap, i.uv.zw + speed)).rgb;
				fixed3 bump2 = UnpackNormal(tex2D(_WaveMap, i.uv.zw - speed)).rgb;
				fixed3 bump = normalize(bump1 + bump2);
				// Compute the offset in tangent space
				//选择切线空间下的法线方向进行偏移,该空间下的法线可以反映顶点局部空间下的法线方向
				float2 offset = bump.xy * _Distortion * _RefractionTex_TexelSize.xy;
				//offset * i.scrPos.z模拟深度越大,折射程度越大的效果
				i.scrPos.xy = offset * i.scrPos.z + i.scrPos.xy;//计算偏移后的屏幕坐标
				fixed3 refrCol = tex2D( _RefractionTex, i.scrPos.xy/i.scrPos.w).rgb;
				// Convert the normal to world space
				bump = normalize(half3(dot(i.TtoW0.xyz, bump), dot(i.TtoW1.xyz, bump), dot(i.TtoW2.xyz, bump)));
				fixed4 texColor = tex2D(_MainTex, i.uv.xy + speed);
				fixed3 reflDir = reflect(-viewDir, bump);
				fixed3 reflCol = texCUBE(_Cubemap, reflDir).rgb * texColor.rgb * _Color.rgb;
				fixed fresnel = pow(1 - saturate(dot(viewDir, bump)), 4);
				fixed3 finalColor = reflCol * fresnel + refrCol * (1 - fresnel);
				return fixed4(finalColor, 1);
			}
			ENDCG
		}
	}
	// Do not cast shadow
	FallBack Off
}
效果:
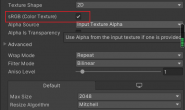
为了得到法线纹理,可以从噪声纹理的灰度值中生成需要的法线信息,把纹理类型设置成normal map并选中create from grayscale 来完成。
再谈全局雾效
前面实现的全局雾效,在同一高度上,雾的浓度是相同的,为了模拟一种不均匀的雾效,同时让雾不断飘动,也可以使用噪声纹理来实现。
与前面的shader绝大多数一样,只是对高度的计算添加了噪声的影响:
相机脚本:
using UnityEngine;
using System.Collections;
public class FogWithNoise : PostEffectsBase {
	public Shader fogShader;
	private Material fogMaterial = null;
	public Material material {
		get {
			fogMaterial = CheckShaderAndCreateMaterial(fogShader, fogMaterial);
			return fogMaterial;
		}
	}
	private Camera myCamera;
	public Camera camera {
		get {
			if (myCamera == null) {
				myCamera = GetComponent<Camera>();
			}
			return myCamera;
		}
	}
	private Transform myCameraTransform;
	public Transform cameraTransform {
		get {
			if (myCameraTransform == null) {
				myCameraTransform = camera.transform;
			}

			return myCameraTransform;
		}
	}
	[Range(0.1f, 3.0f)]
	public float fogDensity = 1.0f;
	public Color fogColor = Color.white;
	public float fogStart = 0.0f;
	public float fogEnd = 2.0f;
	public Texture noiseTexture;
	[Range(-0.5f, 0.5f)]
	public float fogXSpeed = 0.1f;
	[Range(-0.5f, 0.5f)]
	public float fogYSpeed = 0.1f;
	[Range(0.0f, 3.0f)]
	public float noiseAmount = 1.0f;
	void OnEnable() {
		GetComponent<Camera>().depthTextureMode |= DepthTextureMode.Depth;
	}
	void OnRenderImage (RenderTexture src, RenderTexture dest) {
		if (material != null) {
			Matrix4x4 frustumCorners = Matrix4x4.identity;
			float fov = camera.fieldOfView;
			float near = camera.nearClipPlane;
			float aspect = camera.aspect;
			float halfHeight = near * Mathf.Tan(fov * 0.5f * Mathf.Deg2Rad);
			Vector3 toRight = cameraTransform.right * halfHeight * aspect;
			Vector3 toTop = cameraTransform.up * halfHeight;
			Vector3 topLeft = cameraTransform.forward * near + toTop - toRight;
			float scale = topLeft.magnitude / near;
			topLeft.Normalize();
			topLeft *= scale;
			Vector3 topRight = cameraTransform.forward * near + toRight + toTop;
			topRight.Normalize();
			topRight *= scale;
			Vector3 bottomLeft = cameraTransform.forward * near - toTop - toRight;
			bottomLeft.Normalize();
			bottomLeft *= scale;
			Vector3 bottomRight = cameraTransform.forward * near + toRight - toTop;
			bottomRight.Normalize();
			bottomRight *= scale;
			frustumCorners.SetRow(0, bottomLeft);
			frustumCorners.SetRow(1, bottomRight);
			frustumCorners.SetRow(2, topRight);
			frustumCorners.SetRow(3, topLeft);
			material.SetMatrix("_FrustumCornersRay", frustumCorners);
			material.SetFloat("_FogDensity", fogDensity);
			material.SetColor("_FogColor", fogColor);
			material.SetFloat("_FogStart", fogStart);
			material.SetFloat("_FogEnd", fogEnd);
			material.SetTexture("_NoiseTex", noiseTexture);//添加了一些参数,其他不变
			material.SetFloat("_FogXSpeed", fogXSpeed);
			material.SetFloat("_FogYSpeed", fogYSpeed);
			material.SetFloat("_NoiseAmount", noiseAmount);
			Graphics.Blit (src, dest, material);
		} else {
			Graphics.Blit(src, dest);
		}
	}
}
shader:
Shader "Unity Shaders Book/Chapter 15/Fog With Noise" {
	Properties {
		_MainTex ("Base (RGB)", 2D) = "white" {}
		_FogDensity ("Fog Density", Float) = 1.0
		_FogColor ("Fog Color", Color) = (1, 1, 1, 1)
		_FogStart ("Fog Start", Float) = 0.0
		_FogEnd ("Fog End", Float) = 1.0
		_NoiseTex ("Noise Texture", 2D) = "white" {}
		_FogXSpeed ("Fog Horizontal Speed", Float) = 0.1
		_FogYSpeed ("Fog Vertical Speed", Float) = 0.1
		_NoiseAmount ("Noise Amount", Float) = 1
	}
	SubShader {
		CGINCLUDE
		#include "UnityCG.cginc"
		float4x4 _FrustumCornersRay;
		sampler2D _MainTex;
		half4 _MainTex_TexelSize;
		sampler2D _CameraDepthTexture;
		half _FogDensity;
		fixed4 _FogColor;
		float _FogStart;
		float _FogEnd;
		sampler2D _NoiseTex;
		half _FogXSpeed;
		half _FogYSpeed;
		half _NoiseAmount;
		struct v2f {
			float4 pos : SV_POSITION;
			float2 uv : TEXCOORD0;
			float2 uv_depth : TEXCOORD1;
			float4 interpolatedRay : TEXCOORD2;
		};
		v2f vert(appdata_img v) {
			v2f o;
			o.pos = UnityObjectToClipPos(v.vertex);
			o.uv = v.texcoord;
			o.uv_depth = v.texcoord;
			#if UNITY_UV_STARTS_AT_TOP
			if (_MainTex_TexelSize.y < 0)
				o.uv_depth.y = 1 - o.uv_depth.y;
			#endif
			int index = 0;
			if (v.texcoord.x < 0.5 && v.texcoord.y < 0.5) {
				index = 0;
			} else if (v.texcoord.x > 0.5 && v.texcoord.y < 0.5) {
				index = 1;
			} else if (v.texcoord.x > 0.5 && v.texcoord.y > 0.5) {
				index = 2;
			} else {
				index = 3;
			}
			#if UNITY_UV_STARTS_AT_TOP
			if (_MainTex_TexelSize.y < 0)
				index = 3 - index;
			#endif
			o.interpolatedRay = _FrustumCornersRay[index];
			return o;
		}
		fixed4 frag(v2f i) : SV_Target {
			float linearDepth = LinearEyeDepth(SAMPLE_DEPTH_TEXTURE(_CameraDepthTexture, i.uv_depth));
			float3 worldPos = _WorldSpaceCameraPos + linearDepth * i.interpolatedRay.xyz;
			float2 speed = _Time.y * float2(_FogXSpeed, _FogYSpeed);
			//计算noise,_NoiseAmount控制噪声程度,0表示不应用任何噪声,即得到一个均匀的基于高度的全局雾效。
			float noise = (tex2D(_NoiseTex, i.uv + speed).r - 0.5) * _NoiseAmount;
			float fogDensity = (_FogEnd - worldPos.y) / (_FogEnd - _FogStart);
			fogDensity = saturate(fogDensity * _FogDensity * (1 + noise));//加上noise的雾效混合系数
			fixed4 finalColor = tex2D(_MainTex, i.uv);
			finalColor.rgb = lerp(finalColor.rgb, _FogColor.rgb, fogDensity);
			return finalColor;
		}
		ENDCG
		Pass {
			CGPROGRAM
			#pragma vertex vert
			#pragma fragment frag
			ENDCG
		}
	}
	FallBack Off
}
效果:
扩展
噪声纹理可以认为是程序纹理,,由计算机利用算法生成的,perlin噪声和worley噪声是最常用的噪声类型。perlin噪声可以用于生成更自然的噪声纹理,worley噪声通常用于模拟石头、水、纸张等多孔噪声。